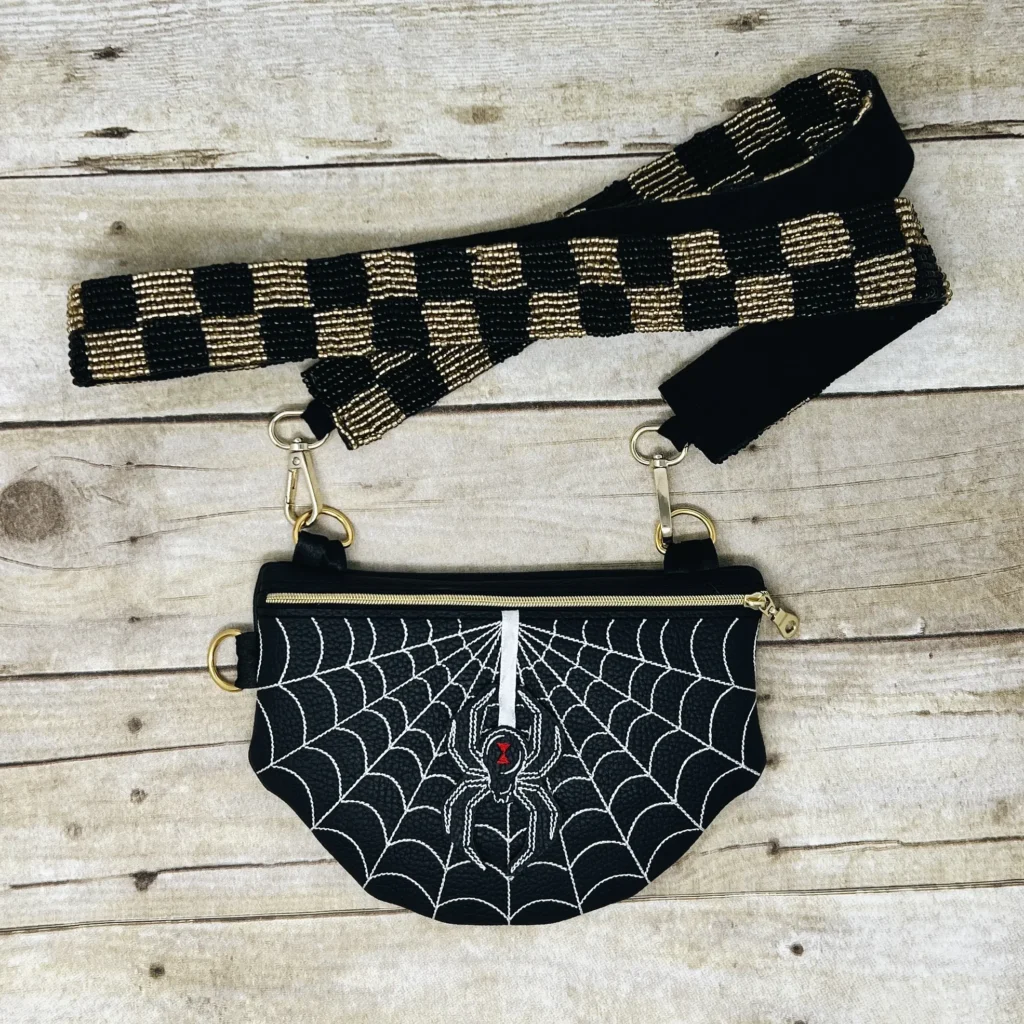
Halloween purse are the perfect way to add a festive touch to your wardrobe! In this tutorial, I will guide you through the exciting process of creating an embroidered spider web purse that you can use for Halloween and beyond.
I am finally back from summer break and I am ready for all things Halloween! One fun accessory you can add to your Halloween wardrobe is an embroidered spider web purse. In the past, we have made in the hoop zippered bags, but this time we will be going over how to add hardware so that we can attach straps to the bag and use it as a crossbody Halloween purse! This is the first time I am trying out a design from String Theory Fabric Art. I have admired their designs for years, and am excited I am finally stitching one of their patterns out now.
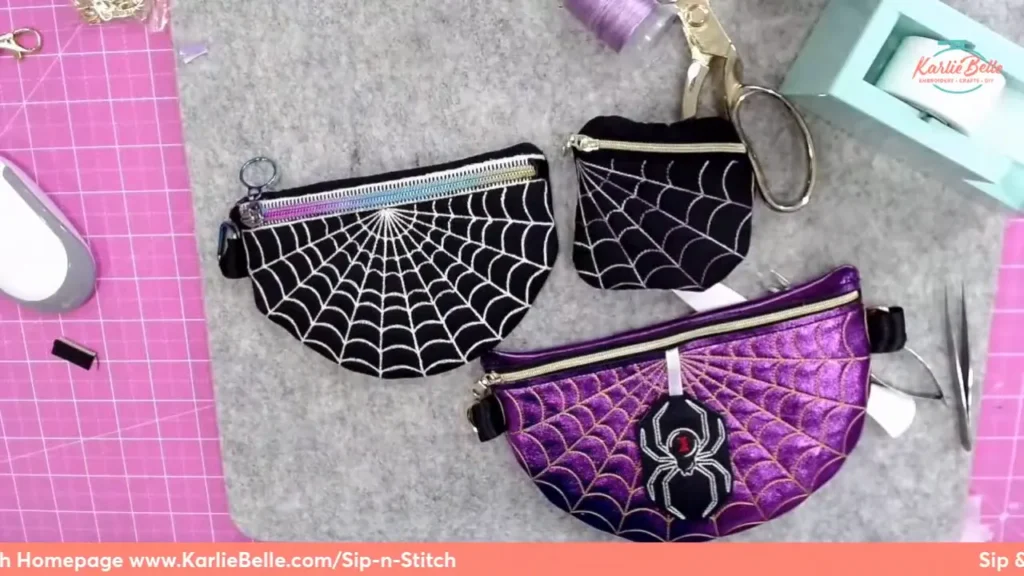
This spider web purse design comes in several sizes and you can either choose to purchase just one size, or get a bundle of all the sizes. The project is done completely in the hoop, even the zipper! There is a 2 part hooping option if you wish to have the hanging spider in the front of the bag. I would say this is more of an intermediate project, but I am hoping that if you follow along in the video, this will be great for beginners to try 😁. For the tutorial, I will be using my Brother NQ1700e and making the 6×10 sized spider web Halloween purse. However the pattern comes in as little as 4×4 and as big as 8×12, so it can be made on any machine.
Supplies Needed:
- Spider Web Purse Design from String Theory Fabric Art
- Join their Facebook Group to stay up to date on sales and discount codes
- Cut Away Stabilizer Use coupon code “karliebelle” to save 10%
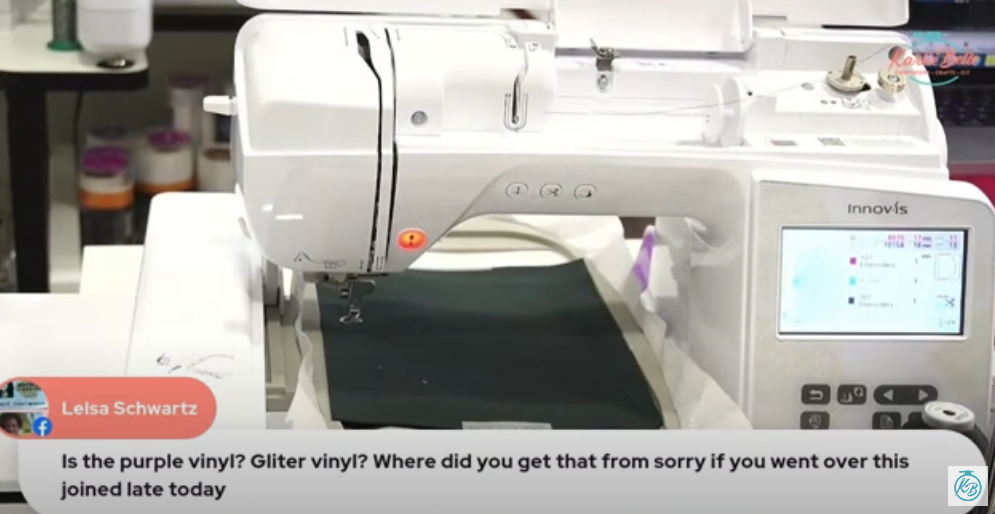
- Faux Leather/ Embroidery Vinyl
- Options on Amazon
- Sweet n Sassy Blanks
- GlitterBug Fairy
- MyPunkbroidery (promo vinyl is great)
- If using Fabric instead of vinyl for outside of bag, then use SF101, Flex Foam, or Batting to give it more structure.
- Fabric for inner Lining
- Fabric or Ribbon for holding hardware and zipper ends
- Skinny Ribbon for Hanging Spider (Optional)
- Bag Hardware
- Lobster Claws and/or D Rings
- Make sure whatever you get matches the width of the ribbon or fabric you are using
- Kimberbell Paper Tape
- Zipper or Zipper Tape
- Zipper Jig
- Hemostats to help turn bag out when done
- Point turning Tool
- Applique Scissors Use coupon code “karliebelle” to save 10%
- Micro Tip Scissors for cutting vinyl
- Organ 75/11 BP Needles Use coupon code “karliebelle” to save 10%
- Precision Tweezers Use coupon code “karliebelle” to save 10%
- Embroidery Thread Use coupon code “karliebelle” to save 10%
- Thread Stand Use coupon code “karliebelle” to save 10%
- Pre-wound Bobbin
- Fabric Tape or Hot Glue Gun
- Make your own strap or buy one
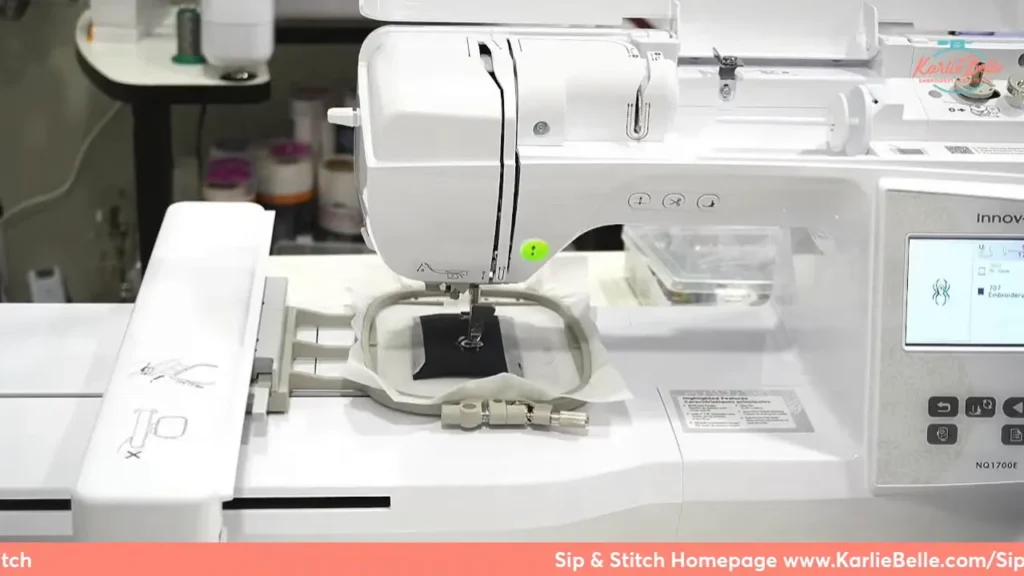
Loading the Design of the 3D Spider and Halloween purse
First, load your design onto a USB stick and insert it into your machine. For these Halloween purse, we are using design pdf from string theory fabric art. The link to this is in the supply list above. If you would like to have the optional 3D spider hanging from your purse, select the spider design and set it up on your machine. Make sure you have black thread loaded for the initial outline stitch.
The first stitch is the outline stitch, which shows you where to place your faux vinyl. Stitch that out and then place the vinyl over the outline.
Stitching the Spider
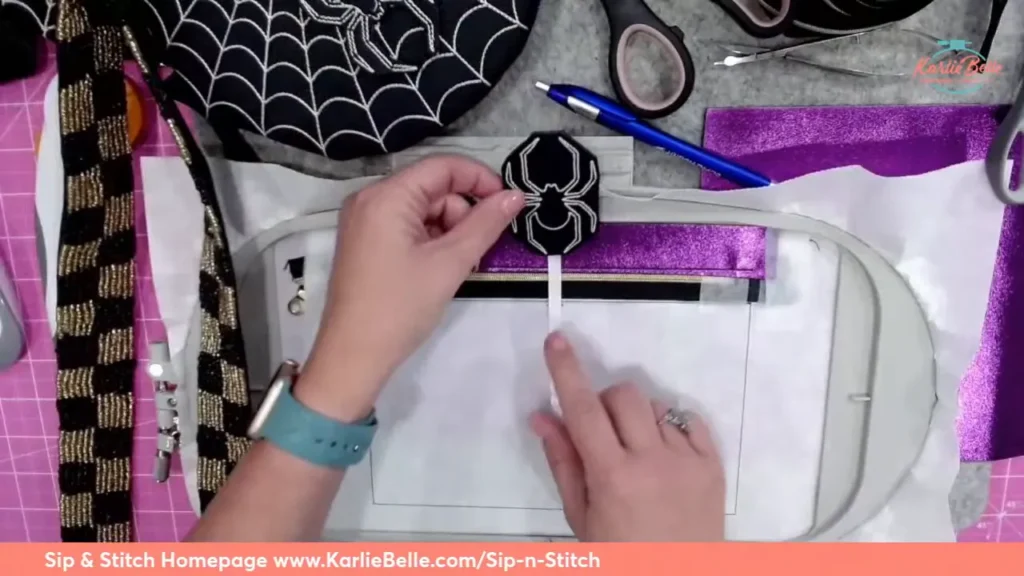
Next, we’ll add the ribbon that will hang the spider from the bag. Cut a piece of ribbon and tape it to the top of the spider outline. Make sure the ribbon is secure and out of the way of the stitching area.

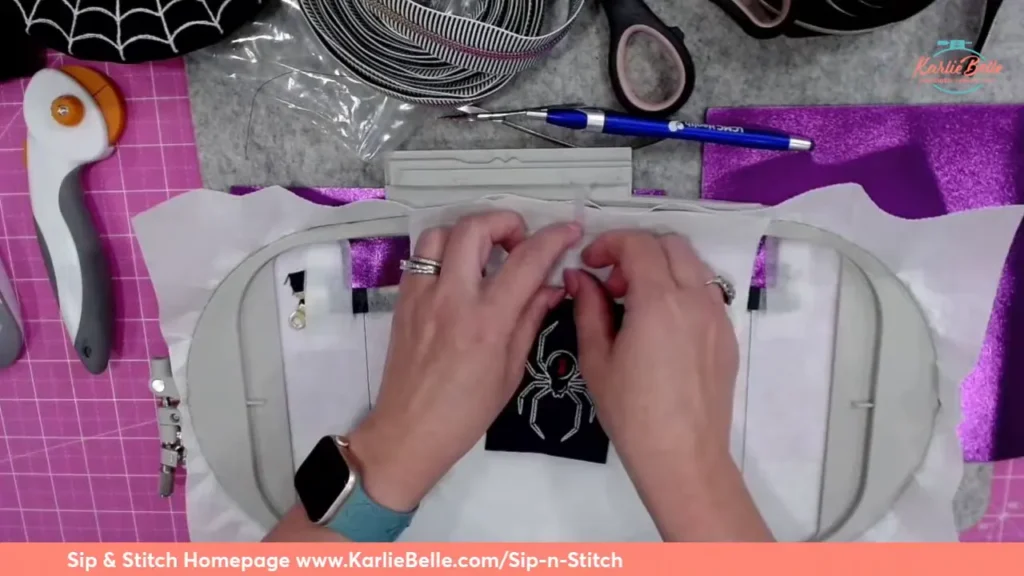
Place the faux vinyl over the outline and secure it with tape if necessary. The next steps involve stitching the inner parts of the spider. I used red thread for the first part and white thread for the subsequent details. You can choose any colors you prefer.
Stitch the inner details of the spider using your preferred thread colors. For this tutorial, we used red and white threads for the spider’s inner details.
Once the inner details are stitched, turn the hoop over and tape another piece of faux leather on the back. Stitch the final outline to secure both pieces of faux leather together.
Carefully cut out the spider, leaving a small border around the stitching. Be sure not to cut the ribbon that will be used to attach the spider to the purse.
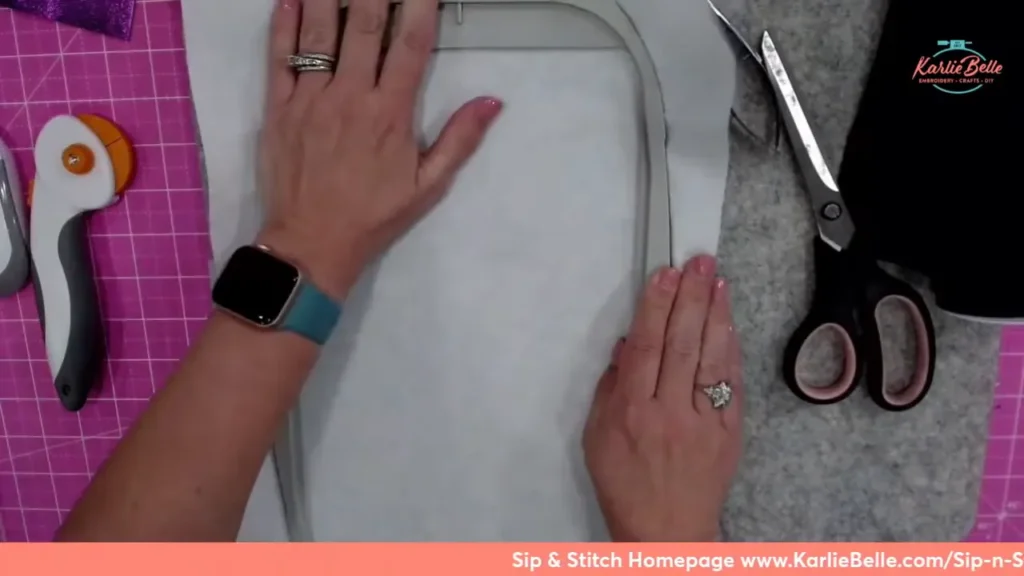
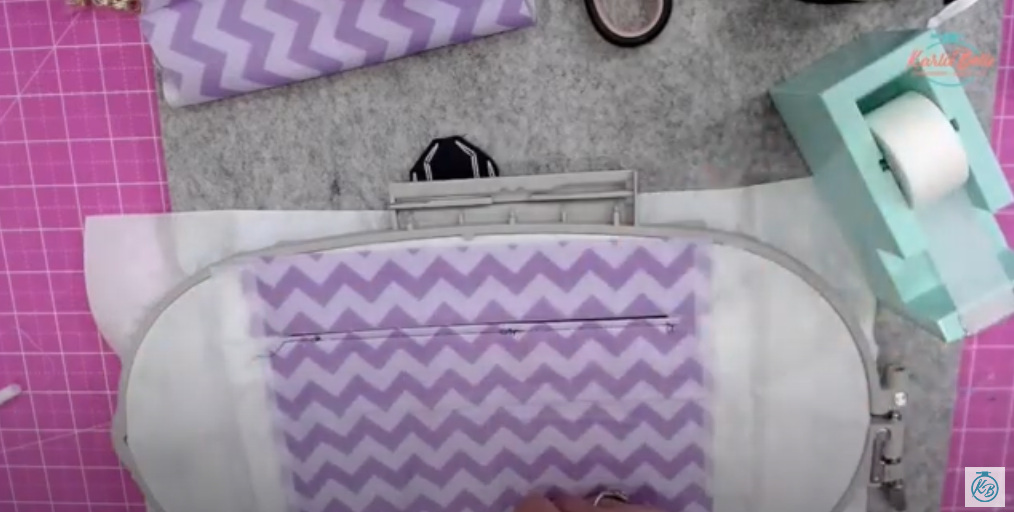
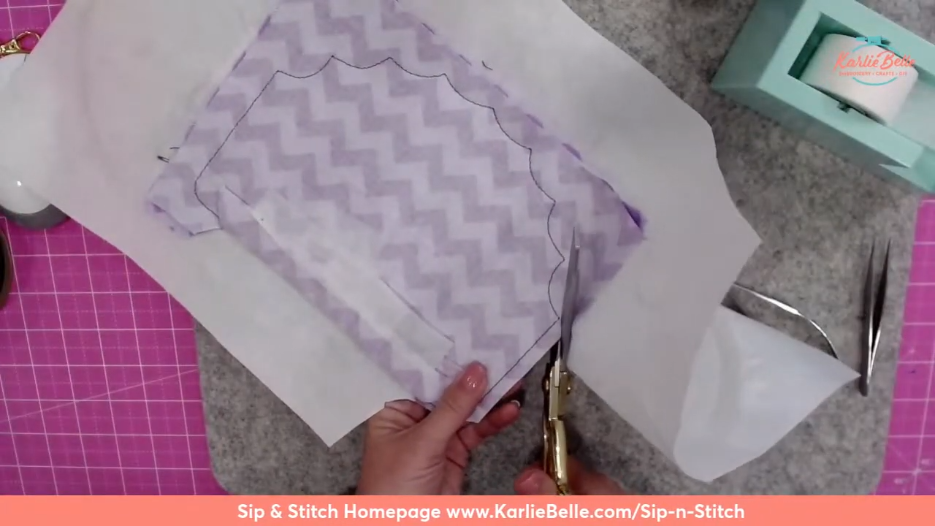
Cutting and Preparing the Bag Pieces
With the spider complete, let’s move on to the bag. You’ll need three pieces of material for the exterior and three for the lining. I used a soft purple metallic faux leather for the exterior and a coordinating fabric for the lining.
Hooping the Stabilizer
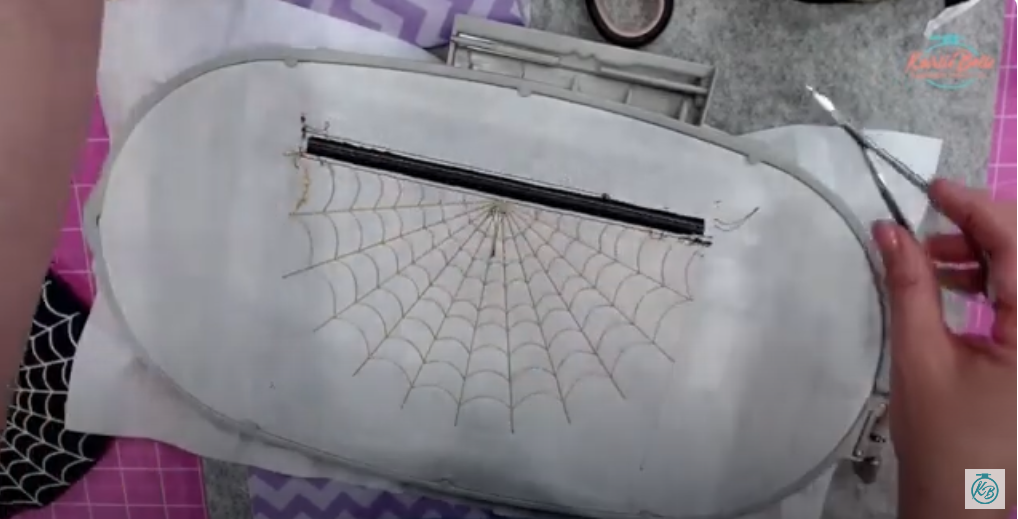
Hoop a piece of cutaway stabilizer in your 6×10 hoop. Make sure it’s tight and secure. Load the bag design onto your machine and stitch the outline, which will show you where to place the zipper and other pieces.
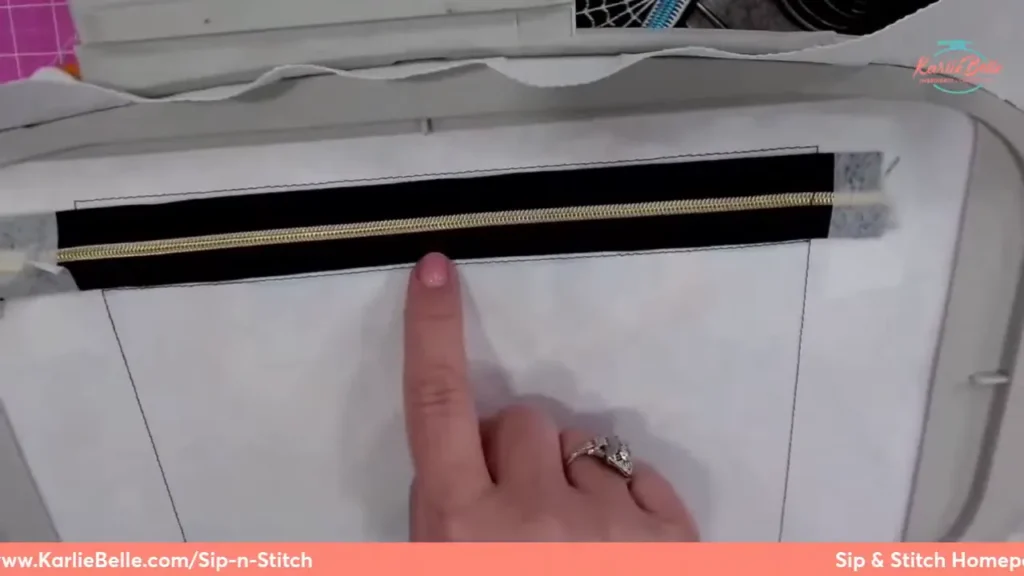
Adding the Zipper
For the zipper, I used zipper tape, which allows more flexibility in length. Cut the zipper tape to extend beyond the sides of the bag outline. Add the zipper pull using a zipper jig for ease.
Place the zipper tape on the outline, ensuring the teeth align with the center lines. Tape it securely and stitch the next step to tack the zipper in place. This stitch will go over the ends of the zipper tape, securing it to the stabilizer.
Adding Zipper Stops
Next, we’ll add little zipper stops to give the bag a finished look. Cut two pieces of black ribbon or fabric, fold them in half, and tape them over the ends of the zipper. Ensure they cover the previous stitches.
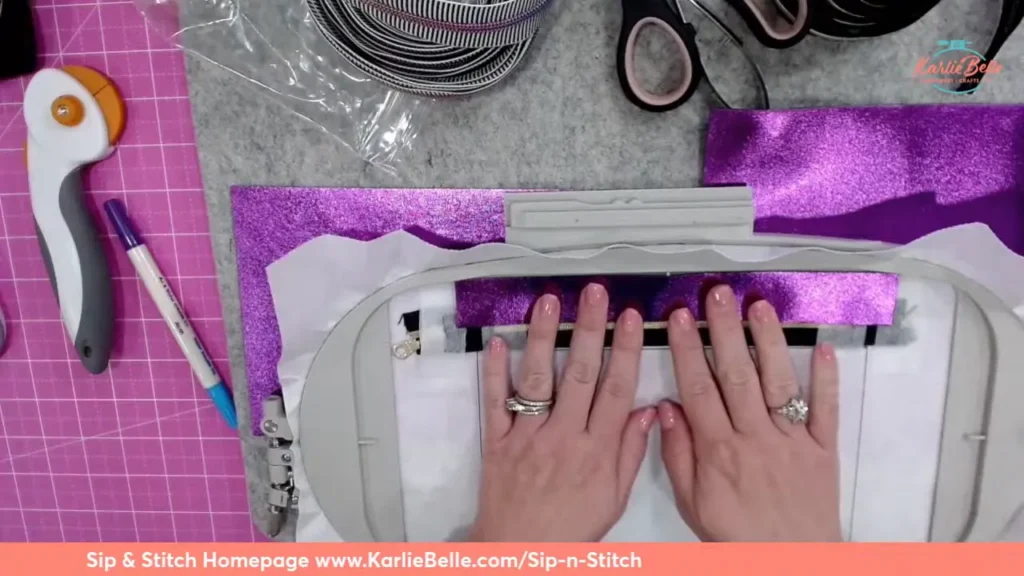
Placing the Top Exterior Piece
Now, place the top exterior piece of your bag, aligning it with the zipper teeth. Tape it in place, ensuring it overlaps the zipper stops. Stitch the next step to secure this piece to the bag.
Placing the Bottom Exterior Piece
Next, place the bottom exterior piece, ensuring it aligns with the bottom edge of the zipper. Tape it securely and stitch the next step to attach it to the bag.
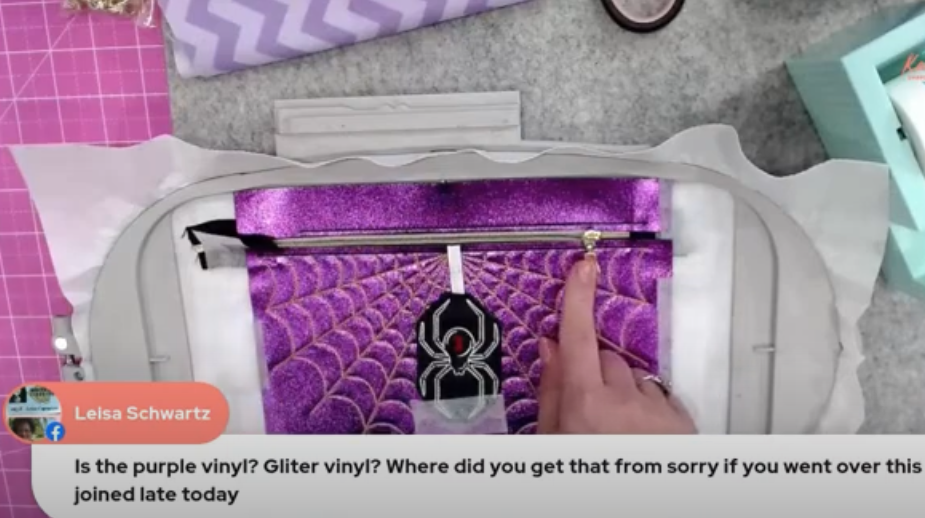
Adding the Spider
There is a placement line to add the spider on string. Determine where you want it to hang on the bag, then tape upside down (good side down)going to top of bag. Use paper tape to secure it in place. This gives the bag its signature 3D effect.
Once you determine spider placement, pull it up and tape it out of the way before adding the bottom exterior piece.
Placing the Bottom Exterior Piece
Next, place the bottom exterior piece, ensuring it aligns with the bottom edge of the zipper. Tape it securely and stitch the next step to attach it to the bag.
Once the front exterior is secure, the next step is the spider web design.
Cut Out Zipper Hole in Stabilizer
Remove hoop from machine and turn on backside. Using small snips, carefully cute out stabilizer behind where zipper is. This will help when it is time to turn the bag out when finished.
Stitching the Lining
Now, add the lining pieces, starting with the top lining piece. Turn the hoop on its backside and align it with the top of where the zipper is and stitch it in place. Repeat with the bottom lining piece.
Move Zipper
Now that the inside lining is attached, it is important to move the zipper to the middle of the bag. All of the rest of the steps involve stitching the outline, and the sipper pull will be out of the way if it is in the middle of the bag taped out of the way.
Adding Hardware for Straps
Now that we’ve got the main body of our bag ready, it’s time to add the hardware for the straps. This step is optional but adds a lot of versatility to your bag, allowing you to transform it into a crossbody, wristlet, or even a belt bag.
Types of Hardware
For this project, we’ll use D-rings and lobster clasps. D-rings are great for attaching straps, and lobster clasps are perfect for making detachable straps. You can find these items easily on Amazon or at your local craft store.
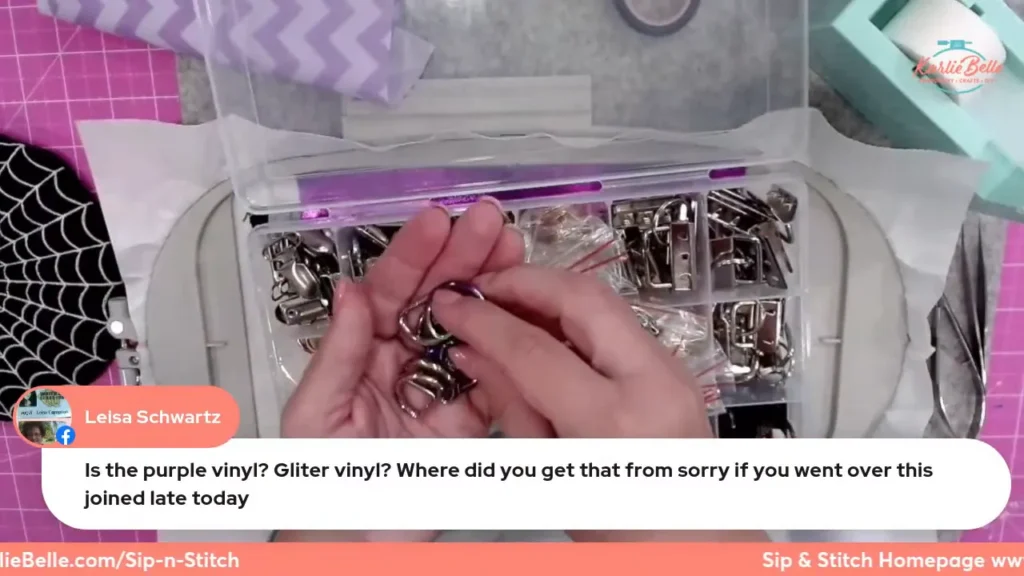
Preparing the Ribbon
Cut two pieces of ribbon, each about 3 inches long. Fold each piece in half and slide a D-ring onto the folded end. The raw edges of the ribbon should align. Tape the raw edges together to keep the D-ring in place.
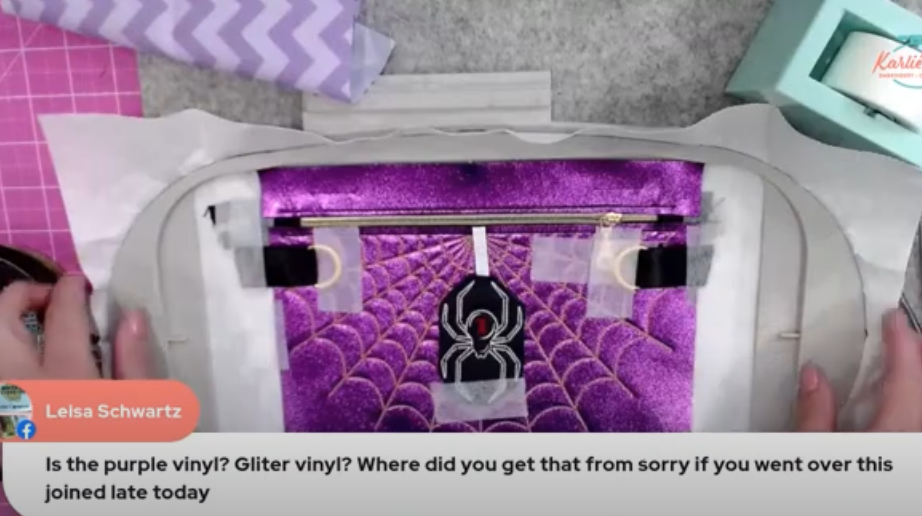
Attaching the Hardware
Place the ribbon with the D-ring between the lining and the exterior fabric of the bag. Position the D-ring so it sticks out slightly from the edge of the bag. Raw side of ribbon should be going to outside of bag and hardware should be going towards the inside of the bag. Tape it securely in place. Repeat this step for the other side of the bag.
Finalizing the Bag Assembly
With the hardware in place, it’s time to finalize the bag assembly. This involves stitching the exterior and lining together and ensuring all elements are securely attached.
Stitching the Outer Edges
Place the exterior back piece pretty side down on the front of the bag. Ensure it covers the entire design. Tape it in place and stitch around the entire outline of the bag.
Adding the Lining Back
Flip the hoop over and place the lining back piece pretty side down, aligning it with the previous stitches. Tape it securely and stitch around the outline, leaving a small gap at the top for turning the bag right side out.
Cut Out Bag
Once the stitching is complete, carefully cut out the bag, making sure to snip the corners close to the stitch line. Also ther should be a hole at the top of your bag. Leave a flap that you don’t trim and tape it out of the way while cutting out bag. This will be helpful when turning the bag right side out and closing up the hole in the liner.
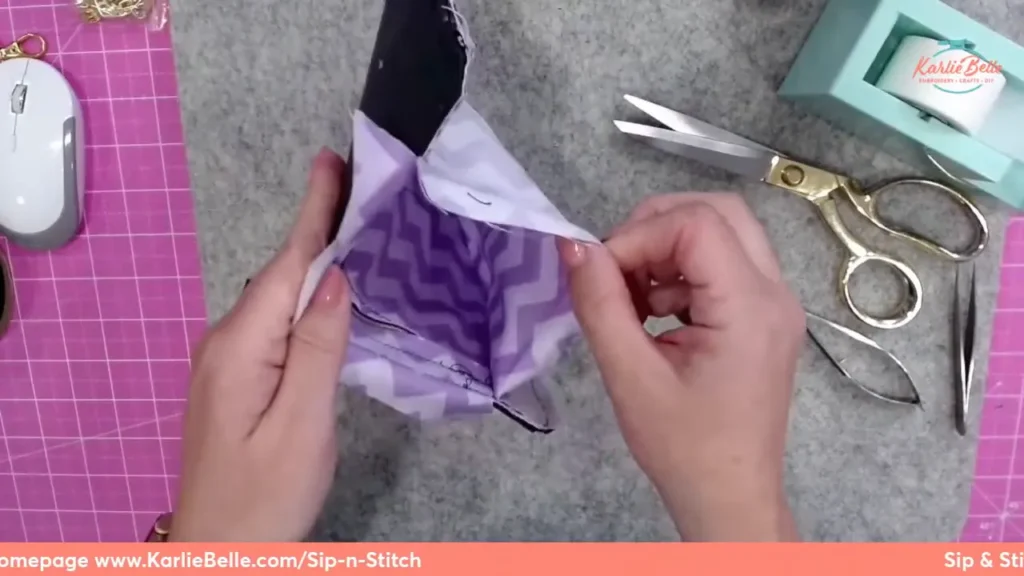
Turning the Bag Right Side Out
Now comes the exciting part—turning the bag right side out. This step can be a bit tricky, especially if you used thick materials.
Using the Opening
Carefully pull the bag through the opening left in the lining. Take your time to avoid tearing any stitches. Once the bag is right side out, use a tool to poke out the corners and edges for a clean finish.
Make sure to open the zipper before turning the bag right side out. This will make the process much easier.
Finishing Touches and Personalization
With the bag turned right side out, it’s time for the finishing touches. This includes closing the opening in the lining and adding any final details to personalize your bag.
Closing the Lining
Fold the edges of the opening in the lining inward and press them flat. Use fabric glue, hem tape, or a needle and thread to close the opening securely.
Adding Personal Touches
Consider adding a personalized touch to your bag. You can embroider a name, add decorative snap tabs or charms, or use a fun strap to make your bag unique.
Creating Additional Sizes and Variations
One of the best things about this project is its versatility. You can easily create different sizes and variations of this bag to suit different needs.
Adjusting the Size
To make a smaller or larger bag, simply adjust the size of your fabric pieces and the embroidery design. Follow the same steps, but with your new dimensions.
Variations
Consider making a set of bags in different sizes. A small coin Halloween purse, a medium wristlet, and a large crossbody bag can make a perfect matching set. You can also experiment with different colors and types of faux leather or fabric.
And there you have it! Your spooktacular Halloween purse is ready. I hope you had as much fun making these as I did. Enjoy your new creations!
Resources
🪡 Learn more about my beginner course on machine embroidery, From Start to Stitch
💻 Enroll in my new course Embroidery Essentials
❤️ Join my Sip & Stitch Squad VIP Membership
🧵 Join my Facebook Group for discussion and help on machine embroidery and crafting
Watch Live on Facebook – Click attending event so that you get notified when I go live!
Watch Live on Youtube – Make sure you are subscribed and click the bell to get notified when I go live!
I look forward to chatting with you Friday morning! #sipnstitchsquad
Thank you for stopping by!