
In my last post, I confessed that I might have a slight obsession embroidery and applique. A few years ago, my newfound hobby took over my dining room table pretty quickly. I had my machine set up at one end and I used the other end to spread out my shirts and get them ready (hooped) to put on the machine. I began collecting fabric every time I went shopping, which also piled up on my table. The organizer in me knew I needed a better setup so I moved my operation upstairs. I turned what was an office/ junk room into a craft room, which now has the lovely nickname “The Sweatshop”, thanks to my husband LOL. Today I’m sharing with you my DIY craft table and how I organized some of my supplies on a pegboard.

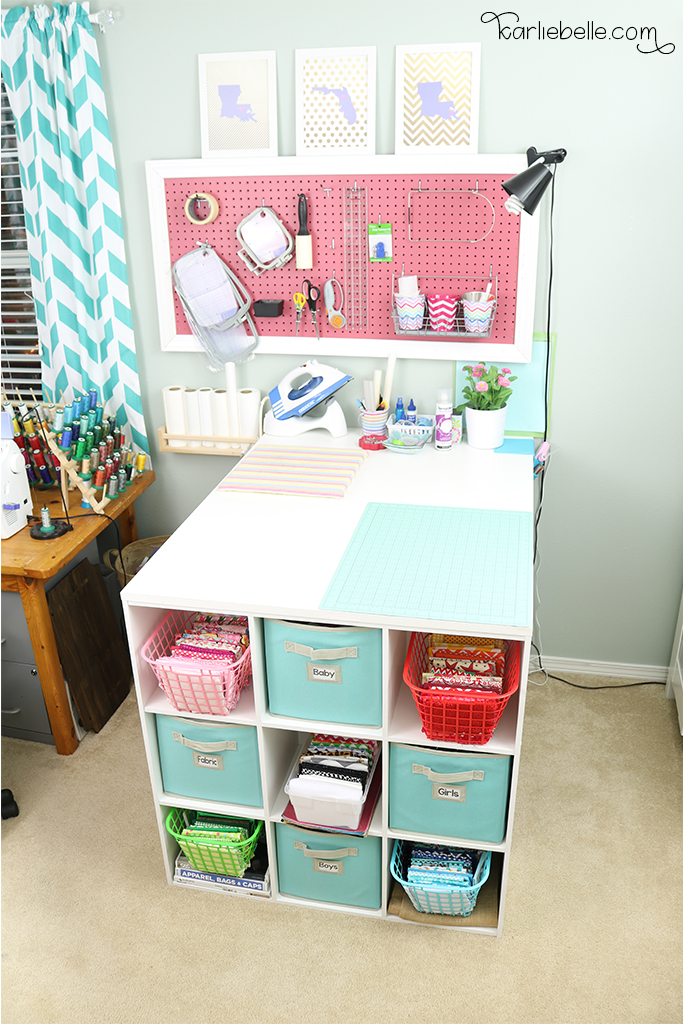
Once I started embroidering items, I realized that I really needed two spaces to get my work done. First, I needed a table to have the actual machine on with enough room around it for the arm to move, and another workspace to spread everything out and hoop items. I decided that the best set up for my craft room would be to have a standard height desk for my embroidery machine so I can sit next to it. For my workspace, I wanted a counter height table that I could stand next to and cut fabric, iron, hoop items, and do other craft projects. I’ve seen a lot of cute DIY craft tables online, but most are in the middle of a room with two small bookcases at either end. I am in a small bedroom and don’t have the space to have something in the middle of the room. My husband suggested that we join it to the wall instead, and I can walk around 3 sides of it and still have one bookcase for storage.
DIY Craft Table for Small Space

My DIY craft table consists of a ClosetMaid Cubeical Organizer, a piece of melamine board, and L brackets. Depending on your space available, you can choose a 2 cubby wide shelf or even a 4 cubby wide shelf. For the length, I purchased a 4′ x 8′ piece of melamine board from Lowe’s and cut it to be 36″ wide and 45″ long. This is where you can customize the table to be any length you want. You can also use plywood that is sanded and painted which might come out a little cheaper.

Since my space was small, we used L brackets to join the free end of the table to the wall. We made sure that the brackets were over studs so that the table was well secured. This also saved us money in that we didn’t have to buy another cubby shelf to hold up the other side of the table. We gave the table a finished look by using iron-on melamine strips to cover the rough edges of the board. My husband also used some small wood screws to join the melamine top to the cubby shelf by drilling through the top of the shelf to secure it.

DIY Pegboard

In order to store some of my embroidery supplies while still having easy access to them, I decided a pegboard would be the best solution. For this project, we started by screwing some 1×2 strips of wood directly into the stud around the perimeter of where the pegboard would go. This helps create a gap between the wall and pegboard to insert metal hooks and organizers. Sidenote…no matter what I want to hang on the wall, Chris wants to put it in a stud. It can be a 0.5 ounce frame, and he wants to hang it on a screw in a stud. So if ever a tornado or hurricane hits my house, I guarantee my pictures will still be on the wall LOL. Ok back to business, a pegboard can end up holding a lot of items which can make it very heavy, so in this case, it is important to attach it to studs.
While at Lowe’s shopping for this project, I picked up a sample container of pink paint for the pegboard. Once the paint was dry we attached the pegboard to the 1×2 boards with wood screws. To give it a finished look we used door trim, painted and mitered the edges, and used a nail gun to attach it to the edges of the pegboard. This also helped hide the screws from where the pegboard is attached to the 1×2 boards.
Pegboard Organization
Once I decided on which items I used on a regular basis and wanted easy access to, I used a pegboard hook and accessories kit to hang them up on the board. Here I hang all my embroidery hoops and grids, scissors, tape, rotary blade, ruler, and other accessories. The basket shown hanging on the board is from Ikea and the buckets in the basket are from the Target Dollar Spot.

On my craft table, I keep my iron and a small ironing board that I made. The ironing board is a square piece of plywood covered in some thin batting, heat resistant fabric, and then some pretty rainbow fabric. I used a staple gun to attach each layer to the back of the plywood. Also since I bought a yard of the heat resistant fabric and only used a little bit, I saved the rest to make pressing pillows for my heat press. These are great if you make shirts using a Silhouette Cameo and heat transfer vinyl. I’ll share more on that in another post :).
Also on my table is a cutting mat that I use with my rotary blade and ruler for cutting fabric and vinyl. There is also a magnetic pin and needle holder, soft tape measure, spray adhesive, fabric glue, and a bucket of pens, disappearing ink marker for fabric, and pieces of parchment paper for protecting fabric from the iron. The light blue piece under the flower pot is a Hobby Holster that holds my hot glue gun and glue sticks. Behind the flower pot is my Silhouette cutting mats. To the left of my iron is a spice rack from Ikea that holds all of my embroidery stabilizers.
Lastly, I added a clip-on light to the top corner or my pegboard. I mainly work in my sweatshop after the kids go to sleep, so I need all the extra light I can get.

I also wanted to mention the three framed states on top of my pegboard. This was one of the first craft projects I did using my Silhouette Cameo. I used pretty scrapbook paper as the background and purple cardstock for the states. In each state there is a heart over the city we lived in. We first met in Baton Rouge, LA while in college at LSU. We later moved to Gainesville, FL where I attended grad school and my husband went to nursing school. Abigail was also born in Gainesville. Now we live right outside of New Orleans, LA where I was born and raised. This is a simple and fun craft project if you have lived in multiple cities :).


I plan to show you more of my craft room/ sweatshop in future posts, including how I organize my fabric and what I store in my cubby shelf. I hope you enjoy my little space and please ask any questions you have about the DIY craft table or pegboard in the comments below.

The post contains affiliate links and I will receive a small commission if you make a purchase after clicking on my link. All opinions are my own and I only promote products that I use and love.


This is such an awesome craft space. I need to do something like this.Thanks for sharing at the #inspirationspotlight party. Stopping by to let you know your post has been shared & pinned.
Thanks so much Theresa!!
That is such a pretty way to get organized. he pegboard does a lot of work and the base for the table also holds a lot!
Thanks Mary! Yes, this table and pegboard are very hard working 🙂