Join me in this detailed brother embroidery machine tutorial where we create adorable Halloween treat bags perfect for kids! I love all things Halloween! We will kick off this month with an adorable in the hoop treat bag. This project is great for kids to give to their cousins, neighbors, friends at school and church, and with teammates and after school activity friends.
This treat bag design comes in sizes from as little at 4×4 up to 7×12. This week I will be using my Brother NQ3600D to make a 4×4 witch treat bag. But you can follow along and make any of the cute treat bags on any machine, the process will be the same no matter what you are using.
Supplies Needed:
- Applique Scissors Use coupon code “karliebelle” to save 10%
- Halloween Treat Bag from Designs by JuJu
- Brother NQ3600D
- Other Embroidery machines that have the same features as mine are:
- Tear Away stabilizer. Use coupon code “karliebelle” to save 10%
- Craft Felt
- Applique Material
- Ribbon
- Fray Check
Brother NQ1700e
Awesome embroidery machine with large 6×10 hoop, cuts jump stitches, wifi enabled, and stitches at speed of 850 spm
Featured machine

Setting Up the Machine
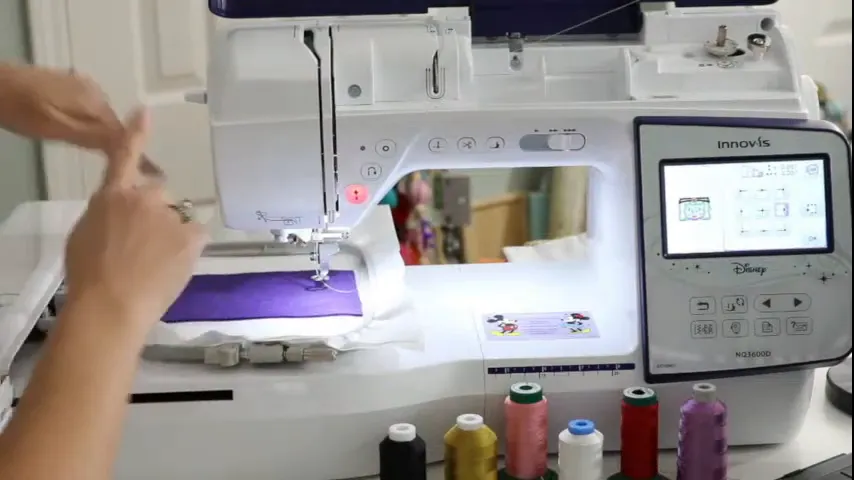
First things first I want you to do before starting this Brother Embroidery Machine Tutorial is prepare our Brother embroidery machine. I’m using the Brother NQ3600D, which is a fantastic sewing and embroidery combo machine. If you’re using a different model, don’t worry, the steps are quite similar.
Hooping the Stabilizer
We’ll start by hooping our stabilizer. I recommend using two sheets of medium tear-away stabilizer to prevent any tearing during the stitching process. Place the stabilizer in the hoop, ensuring it’s taut and smooth.

Setting Up the Design
Next, we’ll load our design onto the machine. In this brother embroidery machine tutorial, I’m using a cute witch design from Designs by Juju. Load the design into your machine, and we’ll start by stitching the face placement.
Positioning the Felt

Now, take the piece of felt that will be the front of your treat bag. As a tip, cut the felt piece slightly larger than the final design to account for any pulling or shifting. Spray the back of the felt with temporary spray adhesive to help it stay in place on the stabilizer. Align the felt on top of the stabilizer, ensuring it covers the entire area where the design will be stitched.
Securing the Felt
For additional security, you can use masking tape to tape down the edges of the felt. This step helps keep the felt smooth and prevents it from moving during the stitching process. However, if you’ve used the spray adhesive properly, this step might be optional.
Stitching the Face
Once the front of your bag is secured down, it’s time to start stitching the face of the witch. This part involves stitching the placement and tack down stitches for the face, hair, hat, and other elements. Follow these steps:
Placement Stitch for the Face
Load your design into the embroidery machine. This Brother Embroidery Machine tutorial assumes you already know some function on using the machine if you are a beginner at embroidery please check out this post. The first stitch is the placement stitch for the face. This stitch outlines where you will place the fabric for the face. Lower the presser foot and start the machine.

Placing the Face Fabric
Once the placement stitch is done, take your fabric for the face. Ensure it covers the entire placement stitch outline. You can use a tool to hold the fabric in place while the machine stitches to avoid getting your fingers too close to the needle.

Step 3: Tack Down Stitch for the Face
Next, the machine will stitch the tack down stitch to secure the face fabric in place. This stitch goes around the placement stitch twice to ensure the fabric stays put. Once it’s done, remove the hoop from the machine, but do not unhoop the stabilizer.

Step 4: Trimming the Face Fabric
Using applique scissors, carefully trim the excess fabric around the tack down stitch. Get as close to the stitch line as possible without cutting the stitches. This step ensures that the final satin stitch covers all raw edges of the fabric.

Stitching the Hair
With the face fabric in place, it’s time to move on to the hair. This involves similar steps to the face stitching process:
Step 1: Placement Stitch for the Hair
Load the next part of the design, which is the placement stitch for the hair. This stitch indicates where the hair fabric should be placed. Lower the presser foot and start the machine.
Step 2: Placing the Hair Fabric
Once the placement stitch is complete, place the hair fabric over the outline. Ensure it covers the entire placement stitch area. Use your tool to hold the fabric in place to avoid getting your fingers too close to the needle.

Step 3: Tack Down Stitch for the Hair
Start the machine to stitch the tack down stitch for the hair. This stitch secures the hair fabric in place. Once done, remove the hoop from the machine, but do not unhoop the stabilizer.
Step 4: Trimming the Hair Fabric
Using applique scissors, carefully trim the excess hair fabric around the tack down stitch. Get as close to the stitch line as possible without cutting the stitches. This step ensures that the final satin stitch covers all raw edges of the fabric.

Stitching the Hat
Next, we’ll stitch the hat. Follow similar steps as before:
Placement Stitch for the Hat
Load the placement stitch for the hat. This stitch indicates where the hat fabric should be placed. Lower the presser foot and start the machine.
Placing the Hat Fabric
Place the hat fabric over the outline. Ensure it covers the entire placement stitch area. Use your tool to hold the fabric in place to avoid getting your fingers too close to the needle.

Tack Down Stitch for the Hat
Start the machine to stitch the tack down stitch for the hat. This stitch secures the hat fabric in place. Once done, remove the hoop from the machine, but do not unhoop the stabilizer.

Trimming the Hat Fabric
Using applique scissors, carefully trim the excess hat fabric around the tack down stitch. Get as close to the stitch line as possible without cutting the stitches. This step ensures that the final satin stitch covers all raw edges of the fabric.
Stitching the Eyes
With the hat in place, we can now move on to stitching the eyes. This step involves adding the white fabric for the eyes and stitching the details:
Placement Stitch for the Eyes
Load the placement stitch for the eyes into your embroidery machine. This stitch will outline where the eye fabric should be placed. Lower the presser foot and start the machine to stitch the placement outline.

Placing the Eye Fabric
Take your white eye fabric and position it over the placement stitch outline. Ensure it covers the entire area. Use your tool to hold the fabric in place while the machine stitches to avoid getting your fingers too close to the needle.

Tack Down Stitch for the Eyes
Start the machine to stitch the tack down stitch for the eyes. This stitch will secure the eye fabric in place. Once the machine finishes stitching, remove the hoop from the machine, but do not unhoop the stabilizer.

Step 4: Trimming the Eye Fabric
Using applique scissors, carefully trim the excess eye fabric around the tack down stitch. Get as close to the stitch line as possible without cutting the stitches. This will ensure that the final satin stitch covers all raw edges of the fabric.
Final Applique Details
Now it’s time to add the final details to our design. This step includes the buckle on the hat and other small elements:
Step 1: Placement Stitch for the Buckle
Load the placement stitch for the buckle into your embroidery machine. This stitch will outline where the buckle fabric should be placed. Lower the presser foot and start the machine to stitch the placement outline.

Step 2: Placing the Buckle Fabric
Take your buckle fabric and position it over the placement stitch outline. Ensure it covers the entire area. Use your tool to hold the fabric in place while the machine stitches to avoid getting your fingers too close to the needle.

Step 3: Tack Down Stitch for the Buckle
Start the machine to stitch the tack down stitch for the buckle. This stitch will secure the buckle fabric in place. Once the machine finishes stitching, remove the hoop from the machine, but do not unhoop the stabilizer.

Step 4: Trimming the Buckle Fabric
Using applique scissors, carefully trim the excess buckle fabric around the tack down stitch. Get as close to the stitch line as possible without cutting the stitches. This will ensure that the final satin stitch covers all raw edges of the fabric.

Stitching the Ribbon
Before we move on. I want to tell you if you are interested there are a lot of Brother Embroidery Machine Tutorial in my blog. If you are looking for something for Halloween I have created a Halloween purse you can check. With all the applique details in place, it’s time to attach the ribbon to our treat bag:
Preparing the Ribbon
Cut a piece of ribbon to the required length (8 inches for a 4×4 hoop, 10 inches for a 5×7 hoop). Use a lighter to gently singe the ends of the ribbon to prevent fraying, or apply a small amount of Fray Check.

Positioning the Ribbon
Turn your hoop over so the back is facing up. Position one end of the ribbon just below the top edge of the hat, ensuring it’s flush with the edge of the felt. Tape it down securely.

Securing the Ribbon
Loop the ribbon and position the other end just below the top edge of the hat on the opposite side, ensuring it’s flush with the edge of the felt. Tape it down securely.
Stitching the Ribbon
Place the hoop back on the machine. Double-check that the ribbon is not folded or caught under the hoop. Start the machine to stitch the ribbon in place.

Final Assembly of the Bag
The next step is to attach the back piece of felt to complete the treat bag:
Step 1: Preparing the Back Piece
Cut a piece of felt slightly larger than the front of the bag. Ensure one edge is straight as this will be the top opening of the bag. Position the felt on the back of the hoop, aligning the straight edge just above the stitched ribbon.

Step 2: Taping the Back Piece
Secure the back piece of felt with masking tape, ensuring it covers the entire design area. Make sure the felt is smooth and taut.

Step 3: Stitching the Back Piece
Place the hoop back on the machine. Ensure the ribbon is not caught underneath. Start the machine to stitch the final outline, securing the back piece of felt to the front.
Trimming and Finishing Touches
With the final stitching complete, it’s time to trim and add finishing touches to your treat bag:
Step 1: Removing the Hoop
Remove the hoop from the machine and take the project out of the hoop. Carefully tear away the excess stabilizer from around the design.

Step 2: Trimming the Bag
Using sharp scissors or pinking shears, trim around the edges of the bag, leaving a small border. Be careful not to cut the stitches or the ribbon.

Step 3: Final Touches
Inspect the bag for any loose threads or frayed edges and trim them as needed. Ensure the ribbon handle is secure and the bag opens properly.

Project Review and Ideas for Future Projects
Congratulations on completing your Halloween treat bag! Here are some ideas for future projects:
- Explore other designs like pumpkins, cats, or Frankenstein’s monster.
- Try creating themed treat bags for other holidays like Christmas or Easter.
- Experiment with different fabrics and color combinations for unique looks.
Thank you for following along with this brother embroidery machine tutorial. Happy stitching!
Thanks for stopping by!