Welcome to a fun and detailed guide on embroidering a tote bag using a flatbed machine. In this tutorial, I’ll walk you through each step, from selecting your tote bag to splitting the design and stitching it beautifully. Whether you’re making a book tote for a teacher or a personalized grocery bag, this guide will help you achieve a professional look. Let’s dive in!
About the Project
Some items like bags, can be hard to hoop and embroider on a flatbed embroidery machine. For this Sip & Stitch I will be showing you a couple of different options of how to embroidery a tote bag on a flatbed machine. I will be making book tote bags to give as Teacher Appreciation gifts with a very cute sketch design from Urban Threads. The size design that I think will look best on the tote is bigger than the hoop I am using, so for this class I will also be going over how to split a design into 2 hoopings. I will be using my Brother NQ1700e embroidery machine and use the 5×7 hoop. I will also be using my Juki TL-2010Q straight stitch sewing machine to sew the bag back up once we are done embroidering the tote bag.
Supplies Needed:
- Tote Bag Options
- Kimberbell Open Seams Tote Bag Blank
- Tote Bags on Amazon
- Tote Bags from Hobby Lobby
- A Book a Day Keeps Reality Away Embroidery Design
- Embrilliance Essentials
- Tear Away Stabilizer Use coupon code “karliebelle” to save 10%
- Applique Scissors Use coupon code “karliebelle” to save 10%
- Organ 75/11 BP Needles Use coupon code “karliebelle” to save 10%
- Precision Tweezers Use coupon code “karliebelle” to save 10%
- Embroidery Thread Use coupon code “karliebelle” to save 10%
- Pre-wound Bobbin
- Sewing Machine
- I am using my Juki TL-2010Q
Brother NQ1700e
Awesome embroidery machine with large 6×10 hoop, cuts jump stitches, wifi enabled, and stitches at speed of 850 spm
Featured machine

Choosing Your Tote Bag
The first step in embroidering a tote bag is choosing the right bag. You have several options, each with its own pros and cons. If you’re using a flatbed machine, some bags might be challenging to work with, but don’t worry, I’ve got you covered!
One of the easiest options is to use a tote bag blank, like the ones from Kimberbell. These bags are designed with open seams, making them super easy to embroider. You simply stitch your design and then sew up the sides. However, they can be a bit pricier, ranging from $12 to $15. If you’re on a budget, you can opt for a regular tote bag and rip open the seams yourself. It’s a bit more work but totally doable.

Understanding the Challenge of Embroidering on Tote Bags
Tote bags, especially those with seams and bulky fabric, can be challenging to hoop properly on a flatbed embroidery machine. Unlike towels or flat fabric, tote bags often require creative solutions to ensure the design stitches out beautifully and aligns correctly.

One common problem is when embroidering a tote bag or any other embroidery design is larger than the hoop size you have available. For example, I used a cute sketch design from Urban Threads—a bookshelf with books—that was bigger than my 5×7 hoop. This meant I had to split the design into two hoopings: the top half and the bottom half. Doing this correctly ensures the finished design looks seamless and professional.
Splitting Your Design for Multiple Hoopings
Splitting a design might sound intimidating, but with the right approach and software, it’s actually quite straightforward. The key is to divide the design into logical parts that can be stitched separately and then aligned perfectly on your fabric.
Here’s how I approached it:

- Separate the Design: I took the original design and split it into two parts: the top half and the bottom half. Each part became its own design and hooping.
- Print Your Designs: I printed both the full design and the split parts. Having a printed guide helps immensely for positioning.
- Positioning: I pinned and taped the top half printout on my tote bag to figure out exactly where it should go. This gave me a roadmap for hooping and stitching the top half first.
- Alignment: After stitching the top half, I used that as a reference point to stitch the bottom half right underneath it. I made sure to keep the spacing consistent—for instance, the top of the book in the bottom half was about an eighth of an inch away from the bottom of the bookshelf in the top half.
Because the design elements were roughly the same width, lining up left and right was easier. If you’re new to splitting designs horizontally (stacking one hooping on top of another), this is a great design to start with.
Tips for Hoop Sizes and Machine Compatibility
When embroidering a tote bag, your hoop size matters a lot. For example, I used a Brother NQ1700e machine with a 5×7 hoop. But if you have a machine like the Stellaire with an 8×12 or a 9.5×9.5 hoop, you might be able to stitch the entire design in a single hooping.
For those with an 8×8 hoop, like on a Persona machine, you could also do this in one hooping depending on your design. But if you ever face a project larger than your hoop, the method of splitting the design, as demonstrated here, is invaluable.

Using Embrilliance Software to Split and Prepare Your Design
Embrilliance Essentials is an amazing embroidery software that simplifies many tasks, including splitting designs for multiple hoopings. Here’s a step-by-step guide on how I used Embrilliance to split my design:
- Open Your Design: Load the design in Embrilliance. The design I used was a sketch style with each shelf in a different color, making it easier to select parts.
- Select the Parts to Split: Using the objects panel, I selected the colors corresponding to the top half shelves. Sometimes, the software doesn’t let you drag a box to select objects, so you can click one color and then hold the Shift key and click the other to select multiple objects.
- Copy and Paste to New Hoop: After selecting the top half, I copied it and opened a new page with a 5×7 hoop set horizontally. Then I pasted the top half design there and used the “Center in Hoop” function to perfectly center it.
- Print and Save: I printed this top half design for reference and stitching.
- Repeat for Bottom Half: I selected the bottom half colors, copied them, and pasted into a new 5×7 hoop set vertically. Again, I centered and printed this for stitching.


This process allows you to separate one large design into two manageable hoopings with minimal effort. The key is that the design’s colors or elements should be distinct enough to split logically. If the design has the same color running throughout, it can be trickier to split horizontally.
Why Embrilliance Is a Game-Changer

Embrilliance’s ability to select by color and easily copy-paste elements into new hoops saves hours of manual editing. It removes the guesswork and frustration of splitting designs, especially for beginners. Plus, the visual interface helps you see exactly what parts you’re stitching in each hooping.
One tip: make sure you’re using the black select tool in Embrilliance to access the submenu for centering and positioning your design elements. This ensures your designs are perfectly aligned within your hoop.
Featured course
Embroidery Essentials
Learn everything there is to know about how to use Embrilliance Essentials embroidery software all in one detailed and comprehensive online course
Preparing Your Tote Bag and Hoop for Stitching
Now that you have your split designs ready, the next step is to prepare your tote bag and hoop for embroidery:

- Stabilizer Choice: For bags, I recommend tearaway stabilizer because it’s easy to remove and supports the fabric well. If you’re embroidering on shirts, use cutaway stabilizer, preferably a large enough piece to hoop once for both the top and bottom halves, so the stabilizer stays inside the garment.
- Hooping Stabilizer: Hoop the stabilizer tightly first. This ensures a stable base for your embroidery. You can also use spray adhesive to lightly stick the bag fabric to the stabilizer for better hold.
- Marking the Center: Use a fabric marker and a ruler to find the center of your tote bag. Mark crosshairs on the stabilizer and align your bag fabric accordingly.
- Positioning the Design: Use your printed design guides to position the fabric on the stabilizer so that your embroidery will be centered and aligned. Pin the fabric outside the embroidery field to avoid needle strikes on pins.

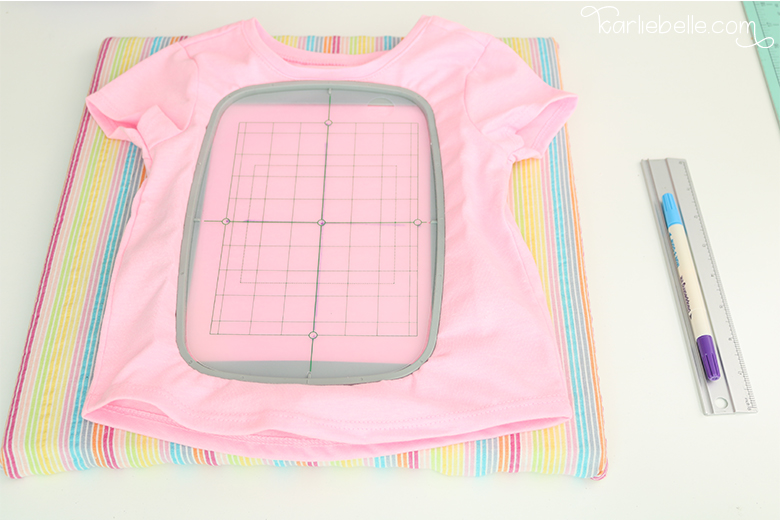
Using the Embroidery Hoop Grid for Precision
Most Brother and Baby Lock embroidery machines come with a plastic hoop grid. This tool is incredibly useful for precise placement. By marking the grid holes with a fabric pen and connecting the dots, you create crosshairs that help you align your fabric and design accurately in the hoop.

Once the stabilizer is hooped and marked, lightly spray adhesive can be applied to keep the fabric in place. Pins can be added for extra security, but be sure to place them outside the stitching area to avoid needle damage.
Stitching and Aligning Multiple Hoopings
After preparing and hooping the top half of the design, stitch it out on your machine. Once completed, you’ll use this stitched portion as a guide to position the bottom half correctly.

Here are some tips for stitching multiple hoopings on a tote bag:
- Use Your Printed Guides: Tape or pin your printed designs to the tote bag for visual reference during alignment.
- Align Carefully: After the first hooping, line up the bottom half design right underneath the stitched portion, maintaining consistent spacing.
- Hoop Stabilizer for the Bottom Half: Either hoop a new piece of stabilizer or float the fabric over the stabilizer if using cutaway.
- Center and Position: Use your fabric marks and the hoop grid to ensure the bottom half lines up perfectly.
- Stitch the Bottom Half: Run the embroidery for the bottom half to complete the full design.
Additional Tips for Multi-Hooping Projects
If your embroidery machine supports multi-point positioning, this can make aligning multiple hoopings much easier. The machine can compensate for slight mishooping or crooked fabric by registering multiple needle positions before stitching.

When adding pins or basting stitches to hold fabric in place, be careful not to apply too much pressure on the hoop, as this can cause the hoop to pop open or distort the stabilizer.
Beyond Splitting: Merging Designs for Bigger Projects
Splitting is just one way to work with designs larger than your hoop. Another approach is merging different designs. For example, you could embroider an applique on the upper part and then add personalized lettering like names or dates underneath in a separate hooping.
This technique allows you to create custom, larger projects without needing a massive hoop. The principles of alignment and hooping remain the same, so mastering splitting will give you the confidence to try merging as well.
Floating the Tote Bag
Floating is a technique where you don’t hoop the actual fabric but rather lay it on top of the hooped stabilizer. This is perfect for thick or bulky items like tote bags. Spray a light adhesive on the stabilizer to make it sticky, then carefully place your tote bag on it, aligning it with the crosshairs.

You can pin the bag to the stabilizer for extra security, but make sure the pins are outside the embroidery area. This way, you won’t accidentally hit them with the needle. If you prefer, you can also use a basting stitch to hold everything in place.
Sewing the Tote Bag
After you’ve finished embroidering a tote bag, it’s time to sew the bag back together. If you used a Kimberbell blank, simply sew up the sides. If you ripped open a regular tote bag, fold the seams back into place and sew them up. You might want to use a serger for a clean finish, but a straight stitch will work just fine.

Double-check that everything is aligned and neat. If you’re adding a lining, now’s the time to do it. A lining can hide the back of the embroidery and add a professional touch.
🎉 Conclusion
And there you have it! You’ve successfully embroidered a tote bag using a flatbed machine. This project is perfect for gifts, personal use, or even to sell. With a little practice, you’ll be able to create beautiful, customized bags for any occasion. If you want to see how to create a applique letters and create a beach bag or we have create embroidery on small bag Please check them out.
Remember these key takeaways:
- Choose designs with distinct color blocks or elements to make splitting easier.
- Utilize Embrilliance’s color selection and hoop resizing tools to split and center parts of your design.
- Use the hoop grid and fabric markings to precisely position your fabric.
- Take your time aligning multiple hoopings for a seamless final design.
- Consider merging different designs or adding lettering to expand your creative options.

With practice, embroidering a tote bag will become second nature, and you’ll be able to create beautiful, personalized gifts like book tote bags or custom totes for any occasion. Happy stitching!
Don’t forget to share your creations with me on social media. I’d love to see what you’ve made! Happy stitching!
Pin it.

💻 Check out past Sip & Stitch projects
🪡 Sign up for my beginner class on machine embroidery From Start to Stitch
❤️ Join my Sip & Stitch Squad VIP Membership
🧵 Join my Facebook Group for discussion and help on machine embroidery and crafting
Thanks for stopping by!